Support
Viewing Grades and Feedback with Crowdmark Assignments
Once grading is completed and released by the instructor, revisit the Crowdmark link in Moodle or click the link in your email notification. You will see your scored assessment, including any stamps, highlights, or text comments left by the graders.
Student Submission of Crowdmark Assignment
Submitting for Different Question Types
Text Questions
Type your response directly into the text box. The box supports Markdown for formatting text, links, and images.
PDF/Image Uploads
Write your answers on paper, keeping each question separate. Use your phone or other device to capture an image of your assignment submission. Save your work as a PDF, JPG, or PNG. Drag and drop the files into the designated upload area for each specific question.
Tips
If you are using phones such as iPhone that use different features to create and capture photos in high definition formats, you may need to save the image as a PDF, JPG, or PNG rather than tranferring the original file which will not be compatible with Crowdmark.
There are free tools that students can download, such as Adobe Scan, that will help format your image correctly and allow straightening, cropping and rotation before saving it.
Rotating and Formatting Pages
Before clicking the final submit button, review your uploaded image thumbnails. If a page is sideways or upside down, click the magnifying glass icon on the page thumbnail, then click the Rotate page button to orient it correctly
Accessing Crowdmark Assignments
Click the Crowdmark assignment link in your Moodle course. You will be routed directly to your assessment page without needing a separate login. Accessing this link via a web browser (desktop or mobile) is preferred over using the Moodle app, as the process of submitting to Crowdmark via the app may not work at all.
Reviewing Instructor Feedback given via Turnitin
This guide details how students click their grade to open Feedback Studio and how to navigate inline comments, QuickMarks, and the rubric scorecard in the right-hand panel.
Student H5P Interactions
Completing an H5P Assignment
H5P activities (such as Quizzes, Interactive Videos, or Course Presentations) are embedded directly within your Moodle course page. Click the activity link and interact with the content. Ensure you answer all embedded questions and click the final Submit or Finish button at the end of the activity to register your score.
Viewing H5P Grades
H5P scores sync automatically to the course gradebook. Navigate to the Grades tab in your Moodle course dashboard to view your earned points for the completed activity.
Should we outline the specific iOS file selection steps for the Moodle Mobile app tutorial before you capture the iPad screenshots?
Submitting Standard Moodle Assignments
Students can view assignment requirements, submit their coursework, and review grader feedback and marks directly within the Moodle Mobile app.
Step-by-Step Instructions
- Open the Moodle Mobile app and tap on your course.
- Locate and tap the assignment activity.
- Tap the Add submission button at the bottom of the screen.
- Image Placeholder:
[Image Placeholder: Screenshot of the Moodle assignment page on iPad highlighting the 'Add submission' button.]
- Image Placeholder:
- Select your submission type:
- Online text: Type or paste your response directly into the rich text box.
- File submission: Tap Add file to upload documents. Choose from your device’s files (iCloud Drive / Files app on iOS), photo library, or record audio/video directly. Alternatively, select a document stored in your Moodle Private files area.
- Image Placeholder:
[Image Placeholder: Screenshot of the iOS file picker menu showing options for Files, Photo Library, and Camera.]
- Tap Save (or Submit for grading if required by your instructor).
- Confirm that the submission status updates to “Submitted for grading.”
Submitting and Resubmitting Papers to Turnitin as a Student
Sometimes instructors use the Turnitin assignment type to accept your submissions. This post explains how to submit these assignments types.
- Click the Turnitin assignment link in your Moodle course.
- Click the Upload Submission button in the assignment dashboard.
- Choose your file (Word, PDF, etc.) and click Upload and Review.
- Review the document preview to ensure formatting is correct, then click Submit to Turnitin.
- Resubmitting: If allowed by your instructor, click the Resubmit button. Note that resubmitting overwrites your previous file, and generating a new similarity report can take up to 24 hours.
Understanding the Similarity Score for Students
This guide explains how to open the report from within the feedback studio view, how the similarity percentage is calculated, and what the different match colours indicate.
Requesting a Paper be Removed from the Repository
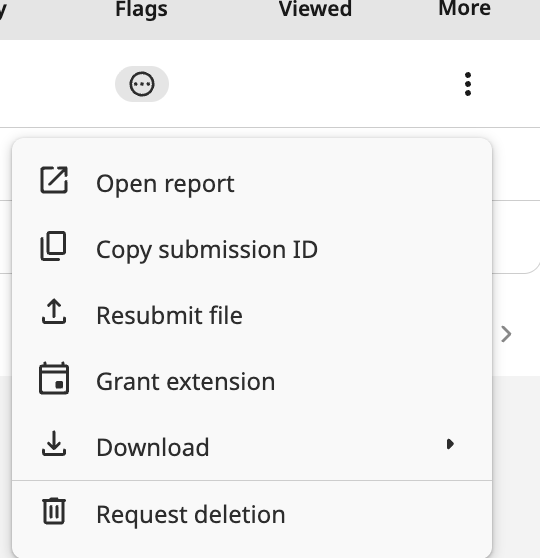
Students cannot directly delete papers from the institutional repository. If you submitted the wrong file or need a permanent deletion, contact your instructor. The instructor will evaluate the request and submit a formal deletion ticket to the University’s Turnitin Administrator.
Once an instructor determines that the a student request for deletion is valid, or they themselves determine a file needs to be deleted, they can click on the hamburger icon beside the sudents name to requesti a deletion of the submission.
Submitting to Turnitin & Crowdmark within the Moodle App
Desktop Recommended
For the best experience, it is highly recommended to use a desktop or laptop computer when completing assignments like Turnitin or Crowdmark. The University of Lethbridge is not the creator of the Moodle app. It was created by Moodle Developers
Mobile Web Browser Alternative
While third-party submission and feedback plugins are supported if the Moodle website has the appropriate remote add-on installed, these plugins typically open in an inset server window that can be difficult to navigate on a small screen. If you must use a mobile device, please access Moodle and the specific assignments via your mobile web browser (such as Chrome or Safari) rather than using the official Moodle app.