Instructor Tutorials

Using Rubrics with your Turnitin Assignments

One of the significant aspects of Turnitin is the ability to create Rubrics for your assignments. Rubrics allow you to keep the grading consistent throughout the grading process. It is beneficial if you have graders helping you mark the assignments.

You still can provide specified feedback, but the grade category descriptions in the rubric offer you and any graders a consistent and well-identified criterion for those grading and the students.

How to create a Rubric

  1. When you create a new Turnitin assignment, you must first set all the Moodle settings for the assignment (don’t worry; it can be edited later), then choose Save and Display to have the Turnitin plugin load your assignment.

You will see all your enrolled students at this point, but there are no submissions.

Note the gear icon

2. Choose the gear icon in the upper right-hand corner of the window.

This will bring up the Turnitin Assignment Settings.

3. In the settings, you can choose the Title, Instructions, Max Grade, Start Date, Due Date, and Feedback Release Date.

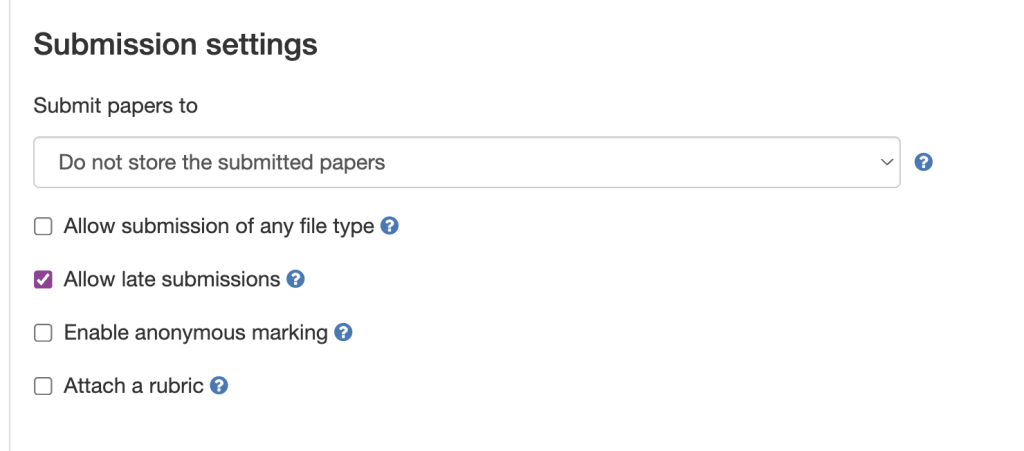
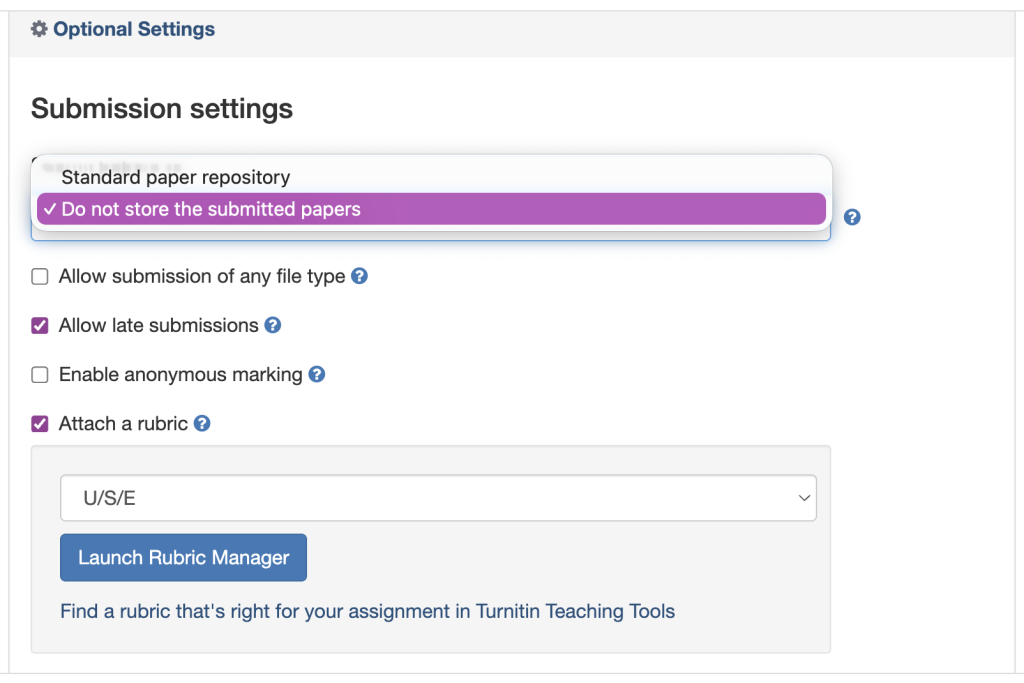
4. Choose Optional Settings just above the Submit button. This will show you Submission Settings, such as whether you wish to submit the paper to a student file repository or allow late submissions.

5. One last option is to “Attach a rubric.” Check off this option.

6. You can choose a rubric from the list.

Or you can choose Launch Rubric Manager.

7. When the Rubric Manager launches, you will see a rubric already displayed, but you are not limited to that option. To access other pre-created rubrics or to create a new one yourself, choose the hamburger menu icon at the top left of the window.

You will be presented with various choices, including creating a new rubric.

8. Choose “Create a New Rubric” from the menu of choices.
A new blank template for a rubric is populated in the window. You can name the rubric, name and weight the scales, and add more criteria or scales.

Once you have entered all the scales and criteria, but sure to name the rubric if you haven’t already. Then you can close the window with your rubric.

The created rubric should be selected from the list below: “Attach a rubric.”


Resources

Below are some resources from Turnitin that discuss how rubrics affect student learning and how designing assignments that encourage students to take responsibility for academic integrity can lead to greater equity in the classroom.

How do Rubrics Affect Student Learning?
https://www.turnitin.com/blog/what-are-rubrics-and-how-do-they-affect-student-learning

What is the history of rubrics? Why do rubrics matter?
https://www.turnitin.com/blog/what-is-the-history-of-rubrics-why-do-rubrics-matter

Annotated Bibliography Rubric
https://www.turnitin.com/rubrics/annotated-bibliography-rubric

Building a culture of academic integrity to keep students and teachers engaged
https://www.turnitin.com/case-studies/blinn-college

How Academic Integrity Supports Diversity, Equity, Inclusion, and Belonging
https://www.turnitin.com/blog/how-academic-integrity-supports-diversity-equity-inclusion-and-belonging

Rubrics to the Rescue
https://www.turnitin.com/blog/rubrics-to-the-rescue

Feedback Studio Upgrades

Turnitin has upgraded Feedback Studio. They have gathered feedback on instructor and student experiences for quite a while and have now released an updated version that implements the input they received. As of May 8th, 2025, users who utilize https://turnitin.com or the Turnitin assessment module within Moodle will use the updated version of Feedback Studio.

If you would like an update on the layout of the new features in the Feedback Studio regarding the feedback experience, please visit the link below.
https://guides.turnitin.com/hc/en-us/articles/35446790262541-Navigating-the-new-grading-and-feedback-experience#h_01JQP2T4BG2HADG262WRWJFC03

Providing Feedback to Students using Feedback Studio

Turnitin integrates wonderfully with Moodle.

Feedback Studio is a valuable component provided by Turnitin. We will take a deeper look at the Feedback Studio, particularly at the tools that can be used to provide practical and usable feedback to students.

Inline comments can be placed directly in the space where the improvement is being suggested.

When you click on the document to insert a comment, another menu appears right where you clicked. That menu contains three options.

Click on the area where you would like to place the comment. A field appears in a pop-up modal window where you can choose the check box icon to insert a quick mark, the comment bubble to leave a comment that can be clicked on and revealed to the student. Finally, you can select the “T” and type text that is visible directly on the screen.

There is also an area where you can comment on the paper overall rather than specific points in the paper.

If typing out feedback isn’t working for you, try the voice comment feature. You need to allow your browser to use the microphone on your system, and then click record to leave a voice message for that student.

To reduce redundancy when providing feedback, create a rubric to grade the assessment and refer to the corresponding criterion in the rubric to ensure your comments target the appropriate level and address the correct criterion.

Turnitin Feedback Studio Rubric Example

Example of a rubric built in Feedback Studio when constructing the assignment.

It is possible to achieve this type of feedback without Turnitin, but you would need to use several programs and upload the feedback files that those programs produce, or copy and paste them. Turnitin and Feedback Studio enable you to complete all the same feedback tasks in one program.

The best part is that once you’re done grading, the grades and feedback automatically sync with your Moodle course—there’s no need to spend time inputting them again.


Resources

Six Ways to Reshape Your Feedback and Increase Student Engagement
https://www.turnitin.com/blog/six-ways-to-reshape-your-feedback-and-increase-student-engagement

Ten Quick Tips for Getting the Best Out of Feedback Studio
https://www.turnitin.com/blog/10-quick-tips-for-getting-the-best-out-of-feedback-studio

Strengthen digital literacy skills with source credibility, QuickMark sets
https://www.turnitin.ca/quickmarks/source-credibility-us-english

Understanding the Similiarity Report

The video below will explain how the Similarity Report can be filtered with specifications that may change the similarity score of the student’s paper, how to identify the similarity matches, and what you can infer from the similarity report.

Copying an Exam from One Course Section to Another

(more…)

Importing Team Members from Moodle to Crowdmark

1. To add members such as graders or facilitators to your Crowdmark Team, Click “Team.”

2. Click “Customize team”

3. You can sync your Moodle course’s teaching assistants and lab coordinators to your grading team in Crowdmark.

Click “course.”

4. Click “Sync with Moodle”

5. Choose what their roles will be in Crowdmark.

6. Once you have assigned roles to your team members, click “Update team.”

7. Sometimes, your graders are not part of your Moodle roster. In that case, you will want to add those users to your team using the steps below.

Tip: Instructors can use a secondary email to add themselves as graders. Taking this action can help with troubleshooting issues for the graders.

8. In the Team window, Click “Add by email

9. Click the “Type (or paste) your team members’ email addresses in the field on the page. Put one address on each line.

10. Once you have entered the email addresses, Click “Continue.”

11. Click “Add 1 team member.”

12. You will now see your team member added to the roster.

Create text answer questions in Crowdmark for exams

1. Once you add questions to your assessment, note that you can have students complete a text entry assessment.

2. Choose “Text answer question” from the drop-down menu to switch to a text answer question.

You have the same editing options as other types of questions.

2. Click the “Question” field and enter your text.

That’s all there is to creating a text entry question

Creating Multiple-choice Questions in Moodle with Crowdmark

1. Crowdmark allows you to choose extra settings for your multiple-choice questions. Click “Settings.”

2. Two options are available in the drop-down menu. Students can select ONE or ALL correct answers.

A) You can set up a question where students must select ALL that apply to the question or statement or;

B) the question can have multiple correct answers, but the student only needs to select ONE of the correct answers, NOT ALL;

Alternatively, you can have the students choose ONE correct answer, and you will only have ONE correct answer identified.

5. Click this icon.

6. Choose how many(If any) points the student will lose for choosing one of the wrong answers.

Remember to click “Save” to confirm and lock in your changes.

Making Image/PDF Questions in Crowdmark

1. Click “add a question” and enter a label for the question if you wish for something different than the default.

2. Choose “Image/PDF question” from the question type drop-down menu.

3. Choose how many points your question will be worth.

4. Click in the question field and enter your question or prompt. You can attach files, link websites, and use other formatting options. Click on the formatting tips below the Question field.

Adding a Crowdmark Activity in Moodle

1. Go to the topic you wish to add the activity to.

2. Click “Add an activity or resource.”

3. Choose External Tool from the menu of choices.

4. Click the “Activity name” field, and enter a name for the activity.

5. Click the Preconfigured tool dropdown menu.

6. Choose Crowdmark Assessment from the menu.

7. Click “Grade,” then modify the Maximum Grade so it is equivalent to the grade that will come from Crowdmark.

8. If you grade a Crowdmark assessment out of 15 but forget to change the maximum grade to 15 in Moodle, you must do so before syncing all the grades to Moodle. You may run into errors when syncing your grades if you do not.

9. If you have different categories in Moodle’s grade area, you can choose the category to which the assessment belongs.

10. You are all finished the Moodle portion of the Crowdmark assessment setup

Tip: This tutorial set up the connection between Crowdmark and Moodle. You will still need to add questions to the assessment. This can be done when you click the Crowdmark assessment on the main course page.

A new Crowdmark window opens up. You can add questions and set the distribution factors in that window.