teachingcentre

Adding a Crowdmark Assessment to Moodle

Connecting Crowdmark to your Moodle course allows you to seamlessly sync your student roster and push final grades directly into your Moodle Gradebook. Setting up this connection correctly from the start prevents the most common grading sync errors.

Here is how to add a Crowdmark assessment to your course page and configure the grading settings.

(more…)

Syncing Your Roster and Grading Team

Once you have added a Crowdmark link to your Moodle course, your next step is to pull your student roster and teaching team into the Crowdmark environment. Crowdmark uses an active connection with Moodle to do this, but you must manually trigger the sync to ensure your lists are up to date—especially during the add/drop period.

Here is how to launch Crowdmark for the first time and sync your users.

1. The Initial Launch

To begin, you must access Crowdmark through the link you just created in Moodle.
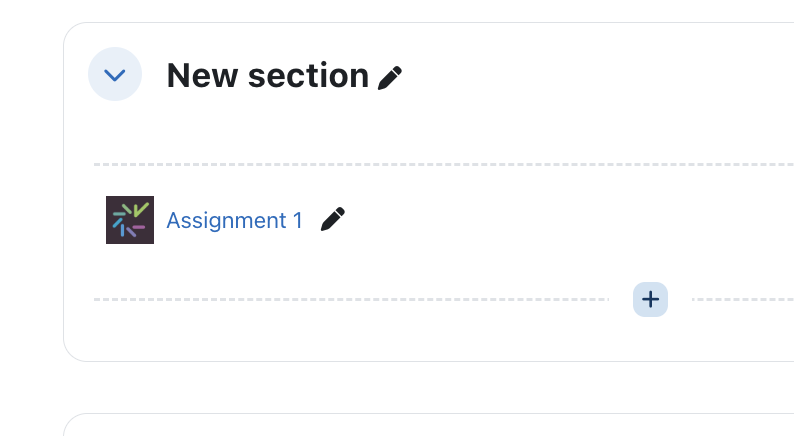
  1. Navigate to your Moodle course page.
  2. Click on the Crowdmark assessment link you previously added.
  3. Because this is your first time launching the tool for this course, Crowdmark will automatically generate the course shell on their end and may prompt you immediately to sync your roster.

2. Syncing Your Student Roster

It is highly recommended that you re-sync your roster right before an exam or assignment to capture any last-minute Moodle enrollment changes.

1.Navigate to the Course Students panel inside the Crowdmark interface.

Once you are in your Crowdmark course, look at the left-hand sidebar menu and click on Students.

2.Trigger the LMS sync:

In the upper right corner of the screen, click the Sync with Moodle button.

3.Confirm the update:

A window will pop up showing the number of students found in your Moodle course. It will list any students who are being added or disenrolled. Click Update students to confirm the sync.
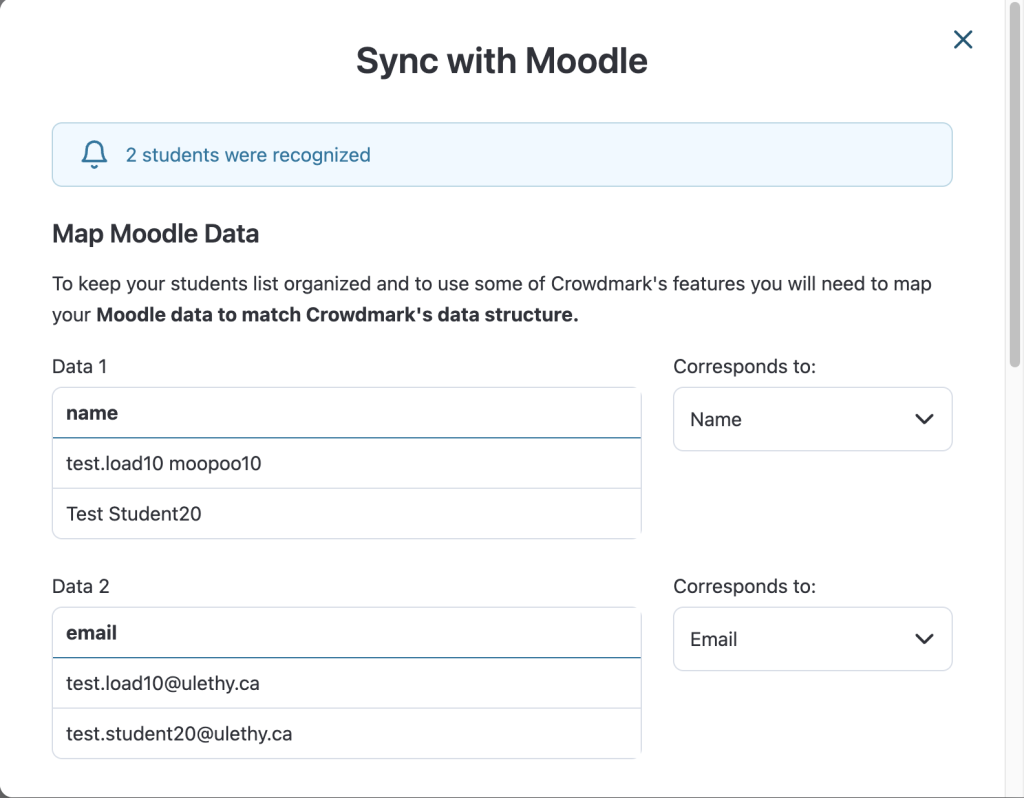
Key insight: Crowdmark pulls the student’s Name and Email address from Moodle. If you need to organize grading by specific lab sections, you can upload a CSV file with section headers directly into the Students tab. Importing a CSV will not break your Moodle connection as long as the student email addresses match.

3. Importing Your Grading Team

If you have TAs, Lab Coordinators, or Co-Instructors enrolled in your Moodle course, you need to sync them into Crowdmark separately and assign them the correct grading permissions.

Students that will act as Graders should be added as Advanced Teaching Assistant within Moodle before they can sync with the Crowdmark Team Panel

1.Navigate to the Team panel:

In the left-hand sidebar menu of Crowdmark, click on Team.

2.Trigger the LMS sync:

REMEMBER
Before triggering the LMS you must add your team members in your Moodle roster first before they can be synced to Crowdmark from Moodle as team members.

Click the Sync with LMS button in the upper right corner. A modal window will appear listing the teaching staff pulled from your Moodle roster.

3.Assign roles: Critical step for grading permissions.

Under the Role column next to each person’s name, use the drop-down menu to select their permission level. (See the role breakdown below). If you do not want to import a specific person, click the x next to their name.

4. Finalize the team:

Click the Add team members button. Crowdmark will automatically email them an invitation link to access the course.
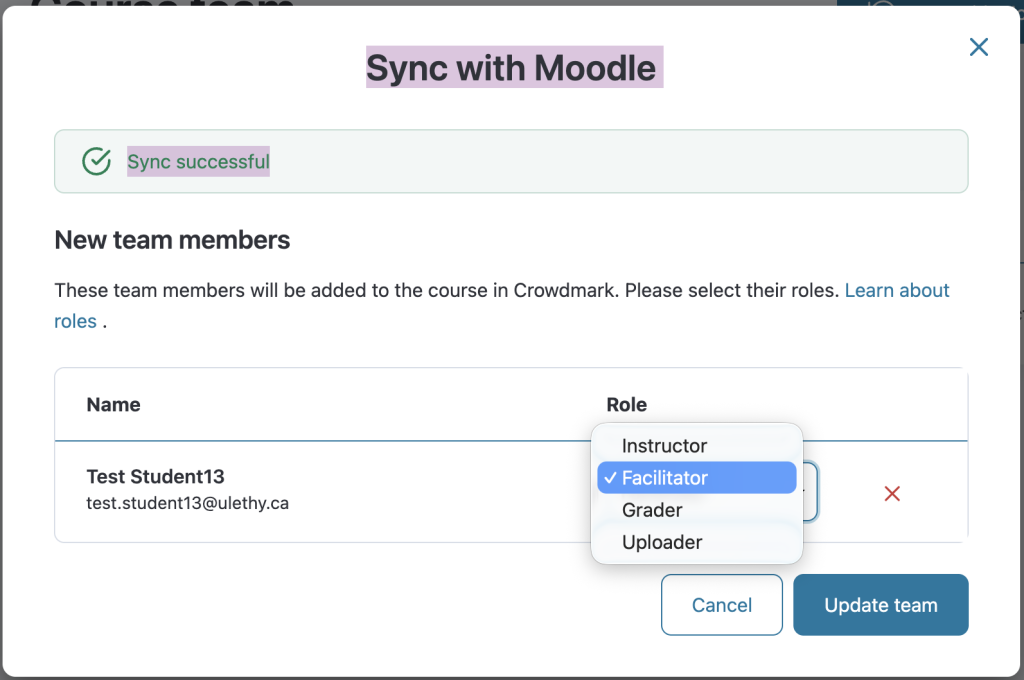
Understanding Team Roles

When assigning roles during the sync, choose the level of access that matches their responsibilities:

  • Facilitator: Has full administrative control. They can edit the assessment, sync rosters, manage the team, and override grades. Best for Co-Instructors.
  • Grader: Can view student submissions, leave feedback, and enter scores, but cannot alter the assessment setup or manage other team members. Best for TAs.

**Uploader: Can only upload scanned PDF booklets to an Administered assessment. They cannot see grades or evaluate student work. Best for administrative support staff or external print shops.

NOTE: If you cannot see your team members in Crowdmark, you will have to make sure the team members are added as advanced teaching assistants, instructors, or non editing teacher in Moodle first, then try to add them to the roster in Crowdmark.

Syncing Crowdmark Grades to the Moodle Gradebook

Note: This tutorial completes the local Moodle-specific documentation series. It should be published as the final step in the Crowdmark workflow, guiding instructors on how to push their completed evaluations back to the Moodle Gradebook.

Once your grading team has finished evaluating all submissions in Crowdmark, the final step is to push those scores directly into your Moodle Gradebook. Because you set up the connection using Moodle’s External Tool, this process requires just a few clicks.

Before you begin, ensure that grading is 100% complete in Crowdmark. Pushing grades multiple times is possible, but it is best practice to perform a final sync once all evaluations are complete.

1. Exporting Grades from Crowdmark

You must initiate the grade sync from inside the Crowdmark interface, not from Moodle.

1.Navigate to the Results panel:

Open your assessment in Crowdmark. In the left-hand sidebar menu, click on Results.

2.Click Export to LMS:LTI 1.3 Integration feature.

In the upper right corner of the Results page, click the Export to LMS button. (If your roster was not synced properly initially, this button might prompt you to sync your roster first).

3.Confirm the Export:

A confirmation window will appear showing how many grades are about to be sent to Moodle. Click Export grades to confirm. Crowdmark will display a success message once the transmission is complete.

[Screenshot placeholder: The Crowdmark Results page with a highlighted box around the ‘Export to LMS’ button]

Troubleshooting Tip: If a student’s grade fails to export, verify that they have an active account in your Moodle course and that their Moodle email matches their Crowdmark email exactly. If they were manually added to Crowdmark with a personal email, their grade will not sync.

2. Verifying the Sync in Moodle

After Crowdmark confirms the export, you should immediately check your Moodle Gradebook to ensure the numbers transferred correctly.

1.Open the Moodle Gradebook:

Return to your Moodle course page. In the main course navigation menu, click on Grades to open the Grader report.

2.Locate the Assessment Column:

Find the column matching the name of your Crowdmark activity.

3.Verify the Scores:The Maximum Grade check.

Check that the student scores appear correctly and that the column total matches your expectations.

[Screenshot placeholder: The Moodle Grader report showing the populated Crowdmark grade column]

⚠️ The 100-Point Sync Error

If you notice that a student who scored 30/40 in Crowdmark appears as 30/100 (or 75/100) in Moodle, there is a mismatch between the assessment totals.

How to fix it:

  1. In Moodle, turn on Edit mode.
  2. Click the three dots next to your Crowdmark activity link and select Edit settings.
  3. Expand the Grade section and change the Maximum grade to match the Crowdmark total (e.g., 40).
  4. Save the changes. The Gradebook will automatically recalculate the correct point values.

Using Crowdmark: Instructor Workflows

Once you have successfully added your Crowdmark activity to Moodle and synced your student roster, the heavy lifting is done! From this point forward, you will be working directly inside the Crowdmark platform to build, deliver, and grade your assessments.

Crowdmark’s interface is designed to be intuitive and flexible. To help you get the most out of their tools, we have curated the most helpful guides directly from the official Crowdmark Help Center. Whether you are running an in-person paper exam or an online assignment, the resources below will walk you through exactly what you need to know.

1. Choosing Your Assessment Type

When you first launch your assessment, Crowdmark will ask you to choose a format.

  • Administered (In-Person): Choose this for paper exams that students will write in a classroom. You will print a booklet, administer the test, and scan the pages back into Crowdmark for grading.
  • Assigned (Online): Choose this for homework, take-home exams, or remote tests. Students will log in, view the questions, and upload their own files or type their answers directly into the system.

2. Creating Questions & Formatting

Crowdmark makes it easy to build your assessments, offering multiple-choice questions, text entries, and file uploads. You can also format your text with bolding, lists, and even mathematical equations.

3. Printing, Scanning, and Matching (In-Person Exams Only)

If you are running an Administered paper exam, Crowdmark uses a unique QR-code system to keep everyone’s pages perfectly organized.

4. The Grading Interface & Feedback Tools

This is where Crowdmark really shines. The grading dashboard is built for speed and consistency, especially if you are working with a team of TAs.

5. The Student Perspective

It is always helpful to know what your students are seeing. When an assessment is ready, direct your students to click the Crowdmark link located inside your Moodle course.

Need help with the Moodle side of things? If you are having trouble syncing your students or pushing your final grades back into your Moodle Gradebook, head back to our local Moodle Answers tutorials:

Administered or Assigned Assessments

 There are two types of assessments available in Crowdmark. Administered and Assigned. 

There are two types of assessments available in Crowdmark. Administered and Assigned. You will want to choose an Assigned assessment. The link below describes the difference between the two.

https://crowdmark.com/help/choosing-an-assessment-type/ (more…)

Troubleshooting Grade Sync Issues

Grades are passed from Turnitin to the Moodle Gradebook via a secure “handshake.” While this is generally more reliable than older versions, you may occasionally find that a grade appears in the Turnitin Inbox but is missing from your Moodle Gradebook. Below are the most common causes and the steps you can take to fix them.

1. The “Self-Fix”: Resend Grades to LMS

If a specific grade (or the whole class) is missing from Moodle, your first step should be to manually trigger a sync. This “pokes” Moodle to look for new data from Turnitin.

  • Enter the Turnitin Assignment Inbox in Moodle.
  • Look for the Sync Roster icon (circular arrows) or the Resend Grades to LMS button in the top right header.
  • Click the button and wait for the “Success” notification.
  • Check your Moodle Gradebook to see if the marks have appeared.

2. Max Grade Conflict

A sync failure occurs when the maximum possible points in Turnitin and Moodle are different values.

If Turnitin has a “Max Grade” of 100 but the Moodle Activity is set a Max Grade of 0, the sync will fail.

Go to Edit Settings for the assignment in Moodle. Check the Grade section. Ensure the “Type” is set to “Point” and the “Maximum grade” matches the value you set in the Turnitin settings.

Be sure to “Save” and then Resync.

3. Anonymous Marking & The Release Date

If your assignment has Anonymous Marking enabled, grades are intentionally blocked from syncing to Moodle to protect student identities during the grading process.

Grades will not sync with Moodle until the Feedback Release Date passes. If you need the grades in Moodle sooner, you must set the Feedback Release Date in Turnitin to a time in the past. This will force all student names to be revealed and push all grades to Moodle.

4. The “Refresh Roster” Trick

Sometimes a student is enrolled in Moodle but hasn’t been “seen” by Turnitin yet, which prevents their grade from being assigned a value.

  1. In the Turnitin Inbox, click the Refresh Roster icon (usually next to the Sync button).
  2. This forces Turnitin to check the Moodle participant list.
  3. Once the student’s name appears correctly in the Turnitin list, their grade should sync within a few minutes.

Bulk Downloads via Turnitin assignments

  1. Navigate to your Moodle course and click on the Turnitin Assignment.
  2. In the Assignment Inbox, look for the Download button located in the top right corner of the submission list.

Choosing the Right Export Type

Turnitin offers five distinct ways to download your class data.

  • Grade Report: Download an XLSX file, so you can keep track of grades in your own way.
  • Submission List: A CSV file that contains the student names and whether or not they submitted
  • Original Files: Creates a ZIP file of all submissions in their original format, and appends the student’s name to the associated file included in the ZIP.
  • Standard PDF’s: Takes the original submission and converts it to standard PDF files, appends the student’s name and compresses all PDFs in a ZIP file.
  • Grademark PDFs: Creates PDF files from the original submissions, adds the Grademark report to the PDF, and compresses all the files in a ZIP file for download.

The Download Process

When you initiate a bulk download (especially for “All Reports and Files” or large classes), Turnitin processes the request in the background.

  1. Compression: You will see a notification stating that your files are being compressed into a ZIP file.
  2. Stay on the Page: For LTI 1.3, it is best to keep the browser tab open while the “Preparing Download” message is visible; however, the message also says you can close the window. But “best results” suggest keeping the window open.
  3. The Zip File: Once ready, the ZIP file will automatically download to your computer’s “Downloads” folder.
    • Note: For large classes (500 students), Turnitin may split the download into multiple ZIP files.

Enabling Anonymous Marking

To use anonymous marking, you must enable it before any student submits. Once a single paper is submitted, this setting is locked and cannot be turned on for that assignment.

  1. Create a Turnitin activity in Moodle.
  2. Click Save and Display to launch the Turnitin window.
  3. Go to Settings (gear icon) > Optional Settings.

Check Enable anonymous marking

  1. Check the “Enable Anonymous Marking” box.
  2. Click Submit.

Grading Anonymously

In your Assignment Inbox, student names will be replaced by a placeholder like “Anonymous User” or “Student 1.” * Feedback Studio View: When you open a paper to grade, the name at the top left will also show as “Anonymous.”

  • Similarity Report: The report will function normally, but the author’s identity will remain hidden within the match details.

Video

Anonymous marking in Turnitin
This video provides a walkthrough of managing submissions and identifying matches in the Feedback Studio interface, the environment where you will be grading during an anonymous session.

Grade Syncing and the Feedback Release Date

The most important administrative rule for anonymous marking is how it handles the Moodle Gradebook.

The “Hidden” Grade: In an anonymous assignment, grades will not sync to the Moodle Gradebook while anonymity is active.

All student names and their corresponding grades are revealed and pushed to the Moodle Gradebook the moment the Feedback Release Date passes.

  • Manual Reveal: If you need the grades in Moodle before the scheduled release date, you must change the Feedback Release Date to a time in the past or use the “Reveal all identities” toggle in the settings.

Missing Names After Release Date

If the Feedback Release Date has passed but names are still showing as “Anonymous” in Moodle, click the Refresh Roster icon in the Turnitin Inbox.

Using Match Groups & Match Overviews in Turnitin

In the latest Turnitin LTI 1.3 update, the traditional “Match Overview” has been replaced by a more sophisticated system called Match Groups. Instead of just showing you a list of sources, Turnitin now automatically categorizes matching text based on how the student has used citations and quotation marks.

This allows you to quickly distinguish between accidental plagiarism, poor paraphrasing, and correctly cited work.

Understanding the 4 Match Groups

When you open the Similarity Report in the Next-Gen Feedback Studio, the right-hand panel (red icon) will display the Match Groups tab. The overall similarity score is now broken down into four distinct categories:

  1. Not Cited or Quoted (Red): The most critical group. This highlights text that matches a source but has no citation and no quotation marks. These are high-priority areas to review for potential plagiarism.
  2. Missing Quotation (Orange): Text that has an in-text citation but is not enclosed in quotation marks. This often indicates a student who has copied verbatim but forgot the quotes, or who has paraphrased too closely to the original.
  3. Missing Citation (Yellow): Text that is enclosed in quotation marks but lacks an in-text citation. This is usually a formatting error where the student attributed the words but forgot the source reference.
  4. Cited and Quoted (Blue): The “Safe” group. This highlights text that is correctly enclosed in quotes and has a corresponding citation.

Refining the Similarity Score

The most powerful feature of Match Groups is the ability to “clean up” the similarity score to see the true area of concern.

How to refine the report:

  • In the Match Groups panel, you will see a percentage next to each of the four categories.
  • Click the Eye Icon (Hide/Show) next to the Cited and Quoted group.
  • The overall similarity percentage at the top of the screen will instantly recalculate, excluding the correctly cited material.

Tip: By hiding the “Cited and Quoted” and “Bibliography” groups, the remaining percentage reflects only the problematic areas (Not Cited or Missing Quotes), giving you a much more accurate “integrity score” at a glance.

Navigating Source Cards

Clicking on any of the Match Groups will open a list of Source Cards related to that specific category.

  • Ranked List: Sources are ranked by the amount of matching text within that specific group.
  • Navigation Arrows: Use the < and > arrows on a source card to jump directly to each instance of that match within the student's paper.
  • Match Details: Each card tells you the total word count and the percentage of the paper that matches that specific source.

Match Groups vs. The "Sources" Tab

While Match Groups is the best tool for checking integrity and finding teachable moments, you can still access the traditional view:

  • The Sources Tab: Located next to the Match Groups tab at the top of the sidebar.
  • What it does: It provides a simple, descending list of every source found in the paper, regardless of how it was cited. Use this if you want to see if a student has over-relied on a single source (e.g., if one source accounts for 40% of the entire paper).

Uploading on a Student’s Behalf

Navigate to your Moodle course and click on the Turnitin Assignment.

In the Assignment Inbox, locate the name of the student you are submitting for.

On the far right of the student’s row, click the Options menu (three dots).

Select Submit File.

Choose a student to upload a file for.

Click Continue to proceed.

Choose a file to upload, or copy and paste text. Click Upload and Review.

After this is complete, you will see that this upload can be accessed again for grading via the link in the assignment inbox.